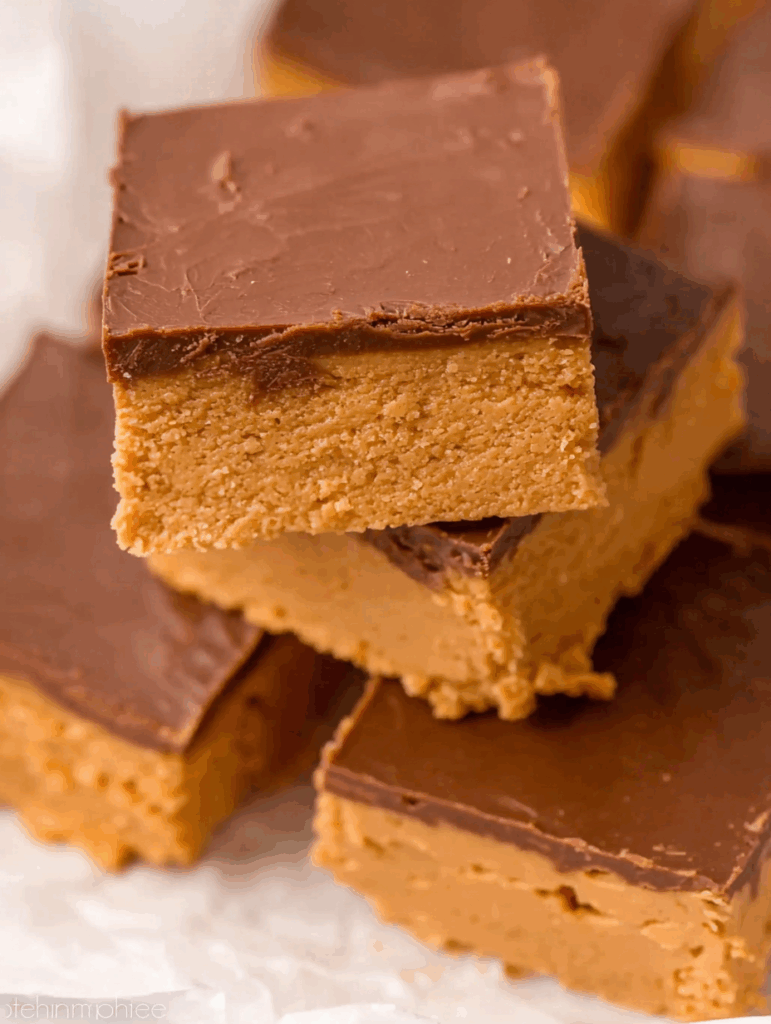
Craving that chocolate peanut butter combo without wrecking your macros? These no bake peanut butter bars are the high-protein, low-effort snack you need. Packed with real ingredients and none of the junk, they’re quick, creamy, and totally satisfying.
Why These No Bake Peanut Butter Bars Deserve a Spot in Your Fridge
A snack that hits macros and cravings? Yep. These bars check every box. Whether you need a pre-lift bite or post-dinner sweet fix, they’re ready in minutes—with zero baking.
They’re Sweet, Salty, Satisfying—And Still Healthy
What makes these no bake peanut butter bars a practical staple?
- Made with 4 real-food ingredients you likely already have
- Naturally gluten-free and easy to make vegan
- Protein-packed version takes just 1 extra step
- Zero refined sugar (maple syrup or honey does the job)
- Taste like a Reese’s peanut butter cup without the crash
Unlike store-bought “health bars” full of fillers, these bars are:
- Free from weird additives
- Sweetened with real ingredients
- Balanced in macros (especially when you add protein powder)
Who Are They Perfect For?
Honestly? Pretty much anyone who:
- Wants to eat better without giving up dessert
- Needs a grab-and-go snack with lasting energy
- Struggles with time, budget, or baking gear
- Loves peanut butter (and who doesn’t?)
These bars are especially great if you’re:
- A busy parent juggling kids and carb timing
- A student skipping ovens but not meals
- A lifter looking for a sweet bite that still fits your split
Recipe
Print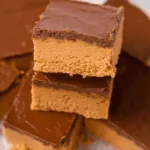
No Bake Peanut Butter Bars
- Total Time: 10 minutes
- Yield: 16 bars
Description
These no bake peanut butter bars taste just like Reese’s but are made with simple, wholesome ingredients. High-protein option included for a snack that fuels your day.
Ingredients
- Peanut butter – 1 cup (260 g)
- Maple syrup or honey – 1/3 cup (100 g)
- Oat flour – 1 cup (100 g), or almond flour
- Dark chocolate – 5 oz (140 g), chopped or chips
- Peanut butter – 1 tbsp (15 g), for melting with chocolate
- Optional: Replace 1/2 cup (50 g) oat flour with 1/2 cup (50 g) protein powder and adjust with more nut butter or oat flour
Instructions
- Line a 9×9 inch (23×23 cm) pan with parchment paper and grease lightly.
- Stir together peanut butter and maple syrup until smooth.
- Add oat flour and optional protein powder. Mix until a dough forms.
- Press dough evenly into prepared pan using a spatula or clean hands.
- Melt chocolate and 1 tbsp peanut butter in 30-second microwave intervals, stirring each time.
- Pour melted chocolate over dough and spread evenly.
- Chill in refrigerator for 1–2 hours or until chocolate is firm.
- Slice into 16 bars. Store in an airtight container in the fridge up to 2 weeks.
Notes
- For high protein bars, replace 1/2 cup oat flour with 1/2 cup protein powder.
- Add more nut butter if dough feels dry; more flour if sticky.
- Try flavor variations like mocha, coconut, or pumpkin spice.
- Freeze for up to 3 months—just thaw 10–15 minutes before eating.
- Prep Time: 10 minutes
- Cook Time: 0 minutes
- Category: Snacks
- Method: No Bake
- Cuisine: American
Nutrition
- Serving Size: 1 bar
- Calories: 185
- Sugar: 5.6
- Sodium: 3.9
- Fat: 11.9
- Saturated Fat: 3.6
- Unsaturated Fat: 6.9
- Trans Fat: 0
- Carbohydrates: 15.7
- Fiber: 2.1
- Protein: 6.8
- Cholesterol: 0
How to Make No Bake Peanut Butter Bars in 10 Minutes or Less
This recipe is so simple, you’ll have it memorized by the second batch. No oven, no fancy equipment—just a bowl, a spatula, and a craving for chocolate + peanut butter.
Ingredients You’ll Need (And Smart Swaps)
You’ll only need 4 main ingredients for the base and 2 for the topping. Here’s the complete breakdown:
Peanut Butter Base:
- Peanut butter – 1 cup (260 g), creamy & salted for best flavor
- Maple syrup or honey – ⅓ cup (100 g), for natural sweetness
- Oat flour – 1 cup (100 g), or almond flour for a grain-free version
Chocolate Topping:
- Dark chocolate – 5 oz (140 g), chopped or use chocolate chips
- Peanut butter – 1 tbsp, stirred into the melted chocolate for that smooth, glossy finish
High-Protein Upgrade (Optional):
- Replace ½ cup (50 g) oat flour with ½ cup (50 g) protein powder
- Adjust texture with more nut butter (if dry) or oat flour (if sticky)
Common swaps:
- Peanut butter → almond butter or sunflower seed butter
- Maple syrup → agave or date syrup
- Oat flour → blended oats (DIY version)
Step-by-Step Instructions
Here’s exactly how to prep these bars without breaking a sweat:
- Line a 9×9-inch pan with parchment paper and lightly grease it. (Coconut oil or butter works fine.)
- In a large mixing bowl, stir together peanut butter and maple syrup until smooth and creamy.
- Add oat flour (and protein powder if using). Mix until a dough forms that holds together easily.
- Press the dough into the pan evenly using a spatula or clean hands.
- In a microwave-safe bowl, melt the chocolate with 1 tbsp peanut butter in 30-second bursts, stirring each time until smooth.
- Pour the melted chocolate over the base and spread it into an even layer.
- Refrigerate for 1 to 2 hours, or until the chocolate is firm.
- Slice into 16 bars, then store in an airtight container in the fridge for up to 2 weeks.
Pro tip: For a cleaner cut, let the bars sit at room temperature for 2–3 minutes before slicing.
Texture Tips (So They Don’t Crumble or Stick)
If your dough feels too dry, add 1 tbsp nut butter at a time.
If it’s too sticky, add oat flour gradually (1 tbsp at a time) until the consistency firms up.
The goal: a soft, slightly sticky dough that holds together easily but doesn’t stick to your fingers.
What Makes These No Bake Peanut Butter Bars a Smart Snack?
There are snacks that fill you up. And then there are snacks that fuel your day. These bars do both—while keeping your goals on track.
High-Protein, Balanced, and Budget-Friendly
Let’s talk macros. Even in their basic form, these bars offer a balanced combo of:
- Healthy fats from nut butter
- Complex carbs from oat flour
- Natural sugars from maple syrup or honey
- Optional protein boost with zero chalky taste
Here’s a look at the estimated macros per bar (standard version):
| Nutrient | Per Bar (Standard) | Per Bar (High Protein) |
|---|---|---|
| Calories | 184 kcal | 185 kcal |
| Protein | 4.7 g | 6.8 g |
| Carbohydrates | 17.5 g | 15.7 g |
| Fat | 11.9 g | 11.9 g |
| Fiber | 2.1 g | 2.1 g |
| Sugar | 5.6 g | 5.6 g |
These bars land in the sweet spot between energy and satiety. They won’t spike your blood sugar, and they help you feel full for hours.
Why it works:
- Peanut butter provides long-lasting satiety thanks to its fat and protein content
- Oat flour adds soluble fiber, helping control cravings
- Dark chocolate adds antioxidants with minimal sugar (especially if you go 70%+ cocoa)
- Protein powder (if added) gives the bar staying power—ideal for post-workout recovery
Fit Your Goals: Fat Loss, Muscle Gain, or Maintenance
Want to lean out but still enjoy dessert? These bars are portion-controlled, sweet but not sugary, and easy to fit into a calorie deficit.
Trying to build muscle? Add the protein boost and use them as a mid-morning or post-workout snack. They’re also a great meal-prep snack between training sessions.
They’re flexible, not fussy:
- Cut into 8 larger bars for higher-calorie fuel
- Slice into 32 mini bites for a pre-run carb nibble
- Add a drizzle of Greek yogurt or melted protein frosting on top for extra protein
These bars work with your routine, not against it.
Storage, Flavors, and Pro Tips for No Bake Peanut Butter Bars
No one wants a “meh” meal prep. With these bars, you’ll never get bored. They store like a dream and can be flavored in endless ways—all while keeping things nutritious and goal-friendly.
Storage Tips That Keep Them Fresh (and Freezer-Friendly)
These bars are designed for real life—aka, chaotic mornings and 3 PM crashes. Here’s how to make sure they’re ready when you are:
Refrigerator:
- Store in an airtight container
- Keeps fresh for up to 2 weeks
- Use parchment between layers to prevent sticking
Freezer:
- Wrap bars individually or store with parchment
- Freeze up to 3 months
- Let thaw 10–15 minutes at room temp for the perfect bite
Meal-prep win: Make a double batch. Freeze half. You’ll always have a protein snack on hand—even when the pantry’s empty.
Flavor Variations to Keep It Interesting
Here’s how to change up your bars without messing up the base structure or macros:
1. Mocha Chip Bars
- Add 1 tsp instant espresso powder to the dough
- Use dark chocolate chips with cacao nibs in the topping
2. Pumpkin Spice Protein Bars (Fall Favorite)
- Swap 2 tbsp peanut butter for canned pumpkin
- Add 1 tsp pumpkin spice + pinch of cinnamon
- Protein version works great here
3. Coconut Crunch Bars
- Mix 1–2 tbsp shredded coconut into the base
- Sprinkle toasted coconut flakes on melted chocolate before it hardens
4. Sweet & Salty Pretzel Bars
- Add crushed gluten-free pretzels into the base or on top
- Optional: a light sprinkle of flaky sea salt on the chocolate layer
5. Double Chocolate Protein Bars
- Add 1 tbsp cocoa powder to the base
- Use chocolate protein powder
- Add mini chips for texture
These upgrades keep things interesting without adding loads of sugar or artificial ingredients.
Final Thoughts
When you’ve got no bake peanut butter bars in the fridge, snack time gets easier, smarter, and way more satisfying.
You get that chocolate-peanut butter fix and a dose of protein—all with no oven, no stress, and no compromise.
Whether you’re meal-prepping for the week or just need a go-to sweet treat, these bars deliver every time.
So next time you’re tempted by a candy bar, reach for one of these instead. You won’t regret it.