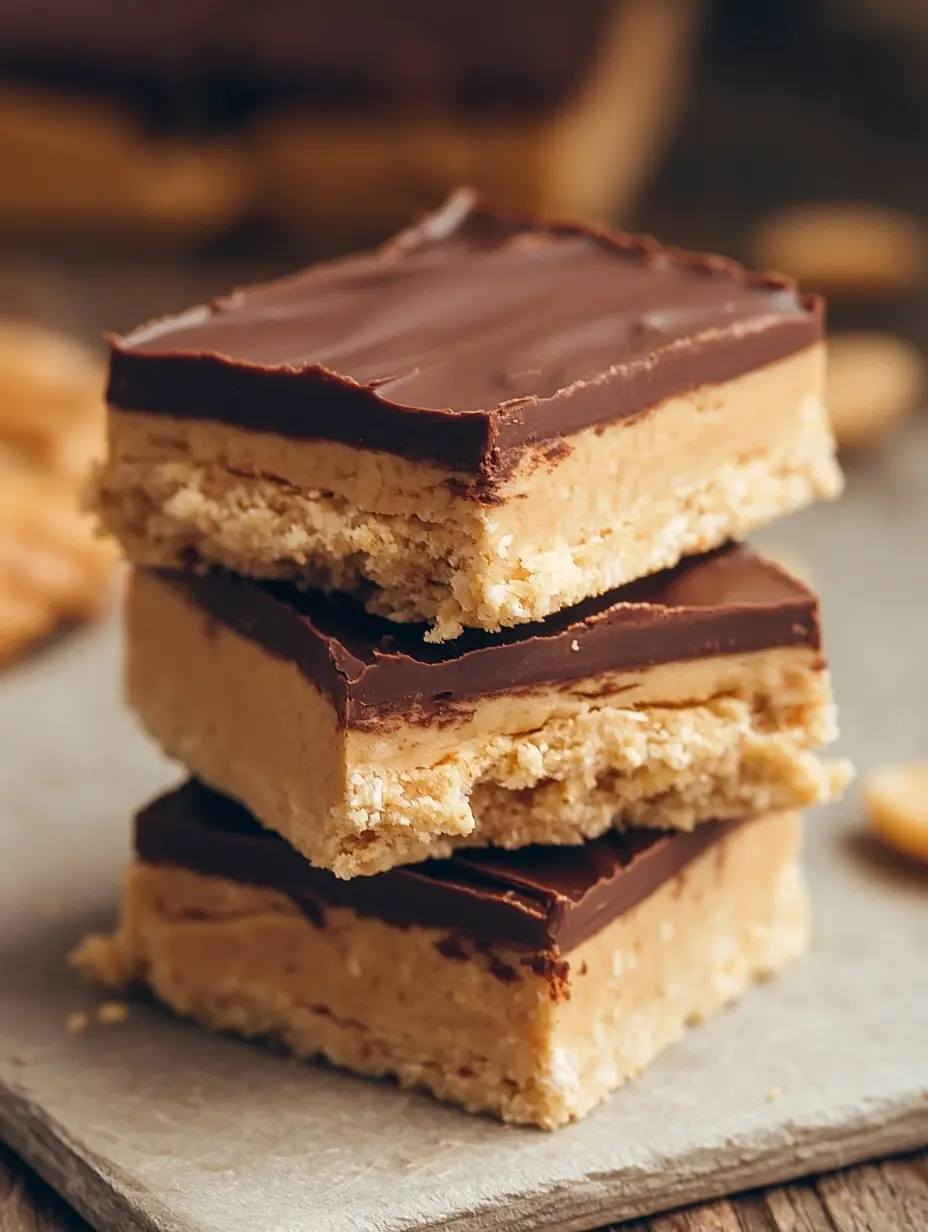
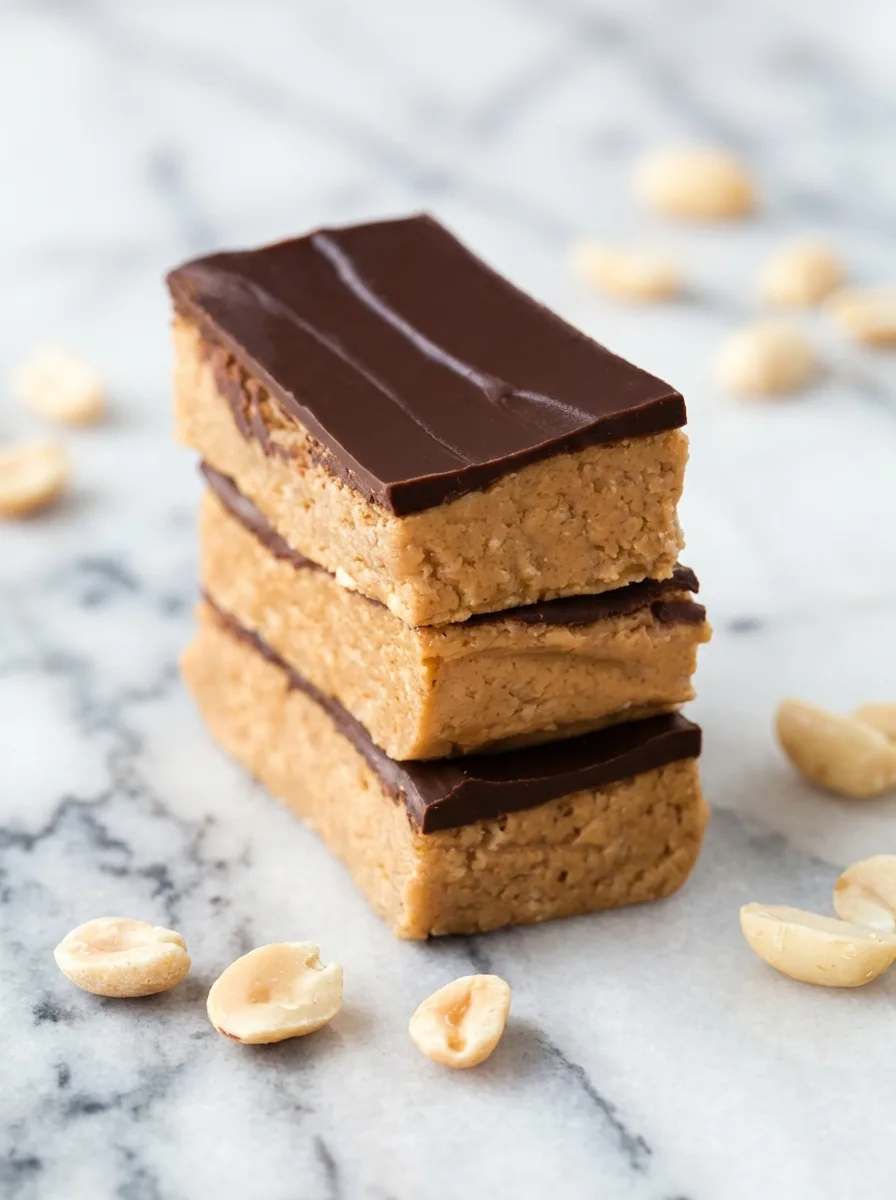
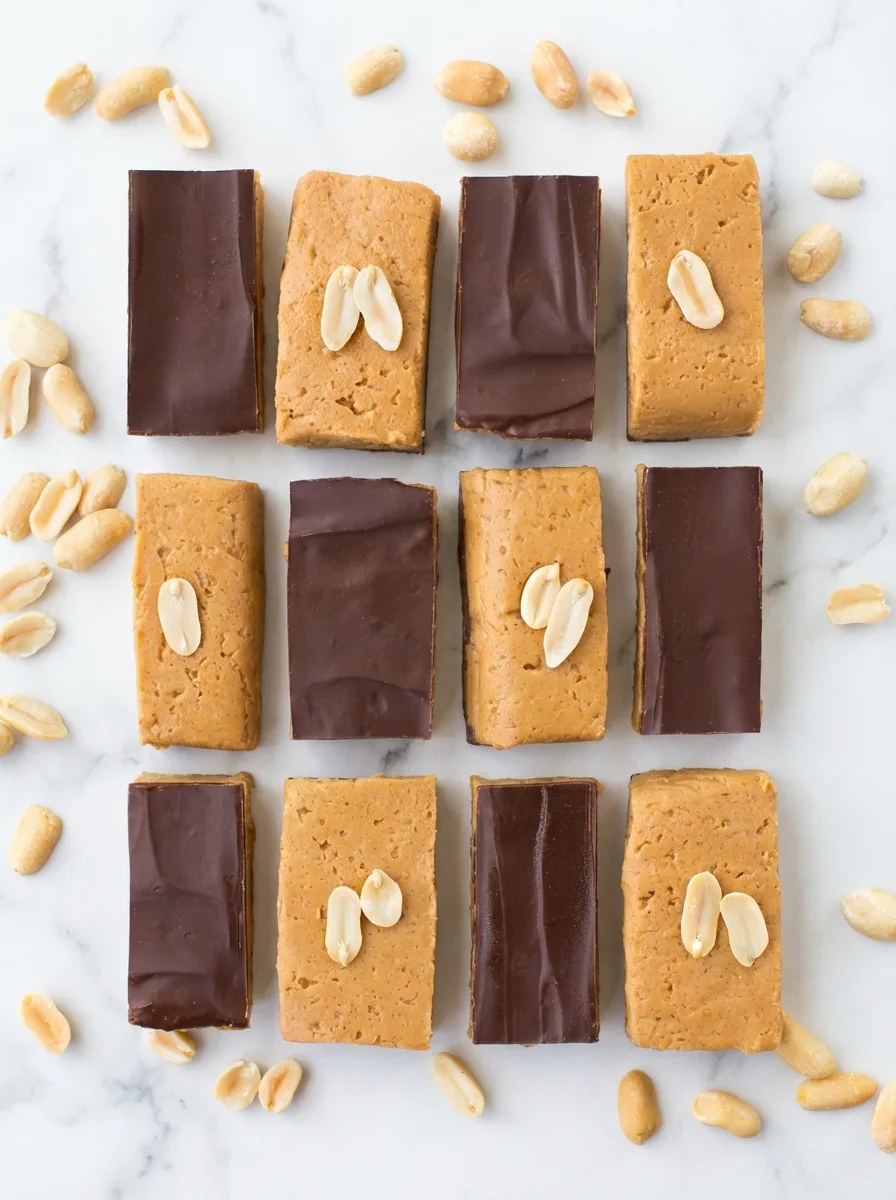
Discover how to make the simplest homemade protein bars that require zero baking. These delicious treats come together in minutes with just a few wholesome ingredients.
Packed with plant-based protein and natural sweetness, they’re perfect for busy mornings, post-workout fuel, or satisfying sweet cravings.
Unlike store-bought options, you control exactly what goes into your bars while keeping them vegan, gluten-free, and free from processed sugars.
Why You’ll Love This Protein Bar Recipe
This recipe revolutionizes snack preparation with its incredible simplicity and customizability. You’ll appreciate the five-minute prep time that fits even the busiest schedules.
More importantly, these bars offer complete ingredient transparency compared to commercial alternatives that often contain preservatives or artificial sweeteners.
The mixture holds together beautifully without requiring complex binding techniques or special equipment. For a satisfying crunch, consider adding our crunchy candied pecans as a topping.
Perfect for Active Lifestyles
These portable bars provide sustained energy thanks to their balanced macronutrient profile. With 12 grams of protein per serving, they effectively support muscle recovery without unnecessary additives. The recipe accommodates various dietary needs – simply use sunflower seed butter instead of peanut butter for nut-free options.
Endless Customization Possibilities
Personalize your protein bars with different mix-ins and coatings. Swap peanut butter for almond butter or experiment with vanilla or chocolate protein powders.
For extra texture, add chia seeds or unsweetened coconut flakes before chilling. This versatility ensures you never get bored with your healthy snacks.
Recipe
Print
The Best Easy No Bake Protein Bar Recipe
- Total Time: 5 min
- Yield: 10 servings 1x
Description
Easy no-bake protein bars with simple ingredients – vegan, gluten-free, and ready in 5 minutes
Ingredients
- 1 1/2 cup peanut butter (360 g)
- 3/4 cup protein powder (90 g)
- 1/4 cup pure maple syrup (60 ml)
- 1/2 tsp salt (3 g)
- 4 oz melted chocolate chips (optional) (113 g)
Instructions
- Stir all ingredients except optional chocolate chips to form a dough
- Shape into bars with your hands or press into lined 8×8 pan
- Refrigerate until chilled then cut into bars
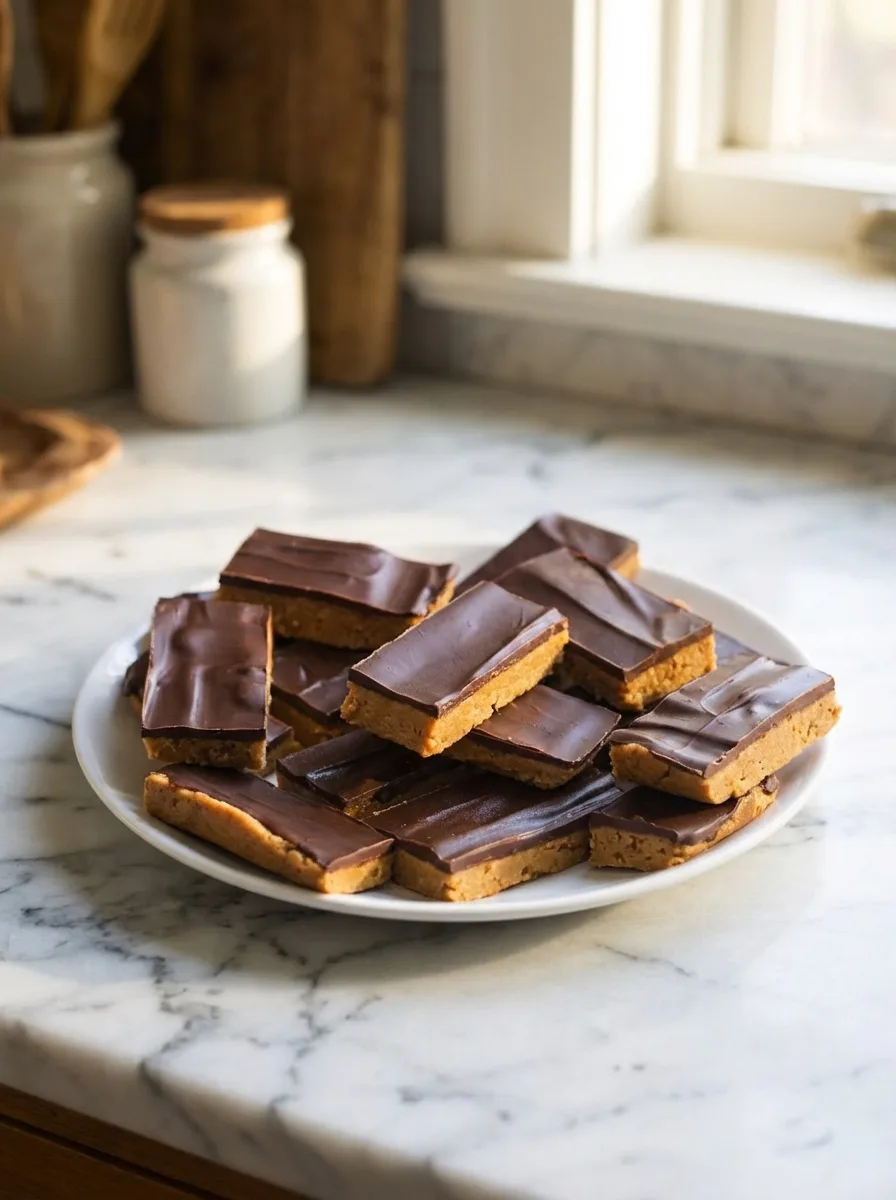
- For chocolate coating: spread melted chocolate over pan before chilling or dip individual bars
- Optional: Stir 2 tsp oil into melted chocolate for smoother coating
Notes
- Use protein powder you enjoy the taste of
- Unsweetened protein powder recommended
- Adjust flavors based on personal preferences
- Prep Time: 5 min
- Category: Main Course
- Method: Baked
- Cuisine: American
Nutrition
- Calories: 160 kcal
- Sugar: 2.9 g
- Sodium: 78 mg
- Fat: 11 g
- Carbohydrates: 5.8 g
- Fiber: 1.8 g
- Protein: 12 g
Ingredients and Substitutions
Quality ingredients make these bars both nutritious and delicious. Here’s what you’ll need and possible replacements:
- Peanut Butter: Use creamy natural varieties without added sugars. Almond butter or sunflower seed butter work perfectly for allergies
- Protein Powder: Choose unsweetened plant-based options like pea or rice protein. Whey protein works too but isn’t vegan
- Maple Syrup: Pure grade A provides the best flavor. Honey or date syrup make excellent alternatives
- Salt: Enhances all flavors – use sea salt or Himalayan pink salt
- Chocolate Chips: Optional dark chocolate coating adds decadence while keeping sugar content low
Sweetener Considerations
For sugar-conscious diets, reduce syrup by half and add 1-2 tablespoons of almond milk to maintain proper consistency. Diabetics can substitute sugar-free maple-flavored syrup, though this may slightly alter texture. Remember to check out our peanut butter banana bread for another low-sugar treat option.
How to Make No Bake Protein Bars
Creating these nutritious snacks requires just three simple steps. No oven means you can prepare them even during summer heatwaves!
Step 1: Combine Wet Ingredients
Add peanut butter and maple syrup to a medium mixing bowl. Stir vigorously until completely smooth and well incorporated. Heating the mixture slightly (10-15 seconds in microwave) makes combining easier if your peanut butter is stiff.
Step 2: Incorporate Dry Ingredients
Gradually add protein powder and salt to the wet mixture. Use a sturdy spatula to fold until a thick dough forms. If the mixture seems too crumbly, add another spoonful of peanut butter. Too sticky? Add an extra tablespoon of protein powder.
Step 3: Shape and Set
Transfer dough to a parchment-lined 8×8 pan, pressing firmly into an even layer. Alternatively, roll dough into 10 equal balls then flatten into bar shapes. Refrigerate for 30 minutes to firm up. For chocolate-coated versions, melt chips with coconut oil and spread over chilled bars before cutting. After slicing, trying our cottage cheese banana bread makes another protein-packed snack.
Optional Decoration Techniques
Personalize bars by pressing chopped nuts, seeds, or dried fruit into the surface before chilling. Create professional-looking drizzle patterns by piping melted chocolate in zig-zag lines over cut bars. Sprinkle with cacao nibs or shredded coconut for added texture contrast.
Pro Tips for Success
Follow these expert suggestions to guarantee perfect bars every time:
- Measure peanut butter by spooning into measuring cups rather than pouring
- Choose protein powders with minimal added ingredients for best flavor
- Refrigerate bars overnight for maximum firmness if planning travel or gym bags
- Line handling surfaces with parchment paper to prevent sticky situations
The dough’s consistency largely determines your success. It should resemble moldable cookie dough – not too wet but not crumbly. Adjust with additional peanut butter or small amounts of plant milk if needed.
Flavor Variations
Transform your base recipe with these mouthwatering twists:
Chocolate Cherry Delight
Add 2 tablespoons cocoa powder to dry ingredients and mix in 1/4 cup chopped dried cherries. Top bars with extra cherries and dark chocolate drizzle.
Coconut Almond Joy
Substitute almond butter for peanut butter and fold in 1/4 cup toasted coconut flakes. Press whole almonds into bar surfaces before chilling.
Berry Blast
Blend freeze-dried berries into powder and add to mixture. The vibrant color and fruity flavor make these perfect summer snacks.
Cinnamon Roll
Add 1 teaspoon cinnamon to dough and roll in cinnamon-protein powder coating before shaping. Top with vanilla glaze.
Serving Suggestions
Enjoy these versatile bars in multiple ways beyond simple hand-held snacks. Crumble over yogurt or oatmeal for instant protein boosts. Break into pieces and mix with nuts for homemade trail mix. For special occasions, cut chilled bars into bite-sized squares and add decorative toothpicks for party-friendly treats.
Complementary Pairings
Serve alongside fresh fruit like apple slices or berries for balanced mini-meals. Pair with unsweetened almond milk for satisfying breakfasts. Post-workout, combine with a banana for quick carbohydrate-protein recovery combination.
Storage and Freezing Instructions
Store chilled bars in airtight containers between parchment layers for up to two weeks. For longer storage, freeze individually wrapped bars in freezer bags for three months. Thaw at room temperature for 10 minutes before enjoying.
Travel Considerations
These bars maintain their shape well in lunchboxes or gym bags for 4-6 hours without refrigeration. For tropical climates or summertime storage, consider insulated lunch bags with ice packs if transporting for extended periods.
Nutrition Facts per Serving
| Calories | Fat | Carbs | Protein | Fiber | Sugar | Sodium |
|---|---|---|---|---|---|---|
| 160 kcal | 11 g | 5.8 g | 12 g | 1.8 g | 2.9 g | 78 mg |
Each bar contains hefty 12g protein to power through busy days. The moderate carbohydrate content provides quick energy without sugar crashes. Healthy fats from peanut butter keep you satisfied longer than typical snack bars.
FAQs About No Bake Protein Bars
Can I make these nut-free?
Absolutely! Substitute peanut butter with sunflower seed butter and choose nut-free protein powders. Always check ingredient labels for manufacturing cross-contamination warnings if allergies are severe.
Why do my bars crumble when cut?
Crumbling usually indicates insufficient binding. Next batch, increase peanut butter by 1-2 tablespoons or refrigerate longer before cutting. Pressing mixture firmly into pan also improves cohesion.
Are they suitable for meal prep?
Perfectly! These bars keep well for two weeks refrigerated. Multiply the recipe easily to create larger batches for weekly meal plans.
Can I bake these for firmer texture?
Though designed as no-bake, you can bake at 300°F for 8-10 minutes if preferring crispier bars. Notice that baking changes nutritional profile slightly through moisture loss.
What protein powder works best?
Neutral-flavored plant-based powders yield best results. Whey isolates work but may create stickier texture. Avoid heavily sweetened varieties that overpower other flavors.
Final Thoughts
This simple no-bake protein bar recipe delivers maximum nutrition with minimal effort. By eliminating complicated steps and hard-to-find ingredients, you can enjoy wholesome snacks anytime.
Customize endlessly based on preferences and dietary requirements while maintaining quality nutrition. Their portable nature makes healthy eating convenient during hectic days.
Once you taste how delicious homemade protein bars can be, you’ll never return to expensive store-bought versions loaded with additives. So grab your ingredients and get ready to transform your snack routine!