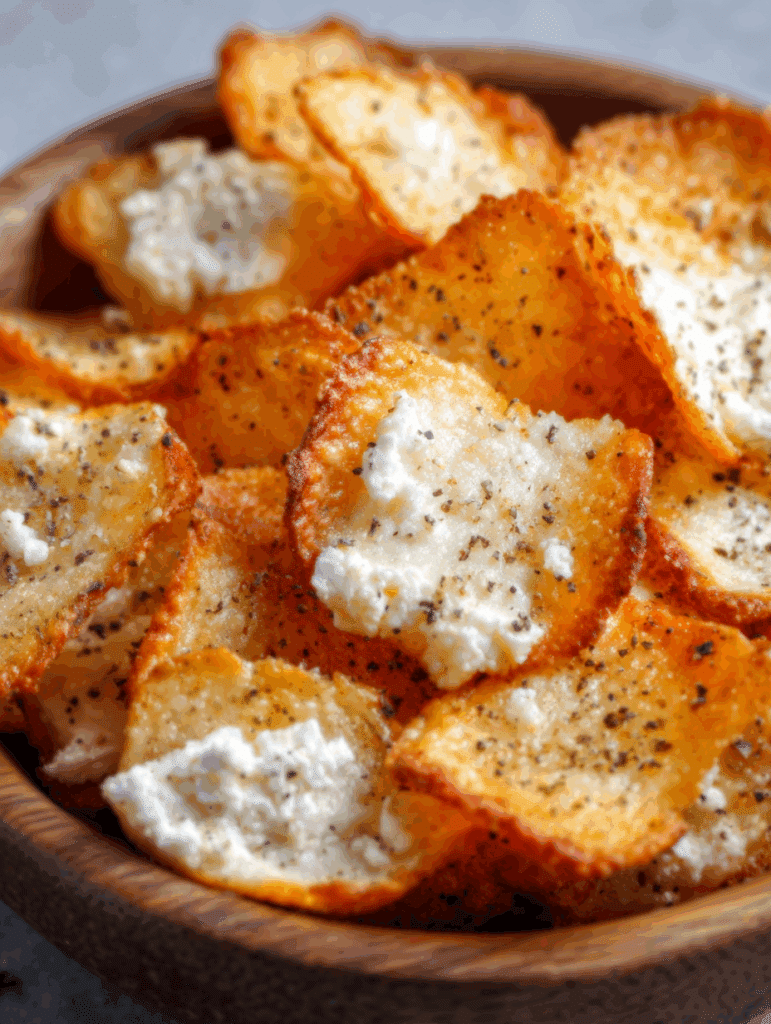
Looking for a crunchy, high-protein snack that won’t derail your goals? These Cottage Cheese Chips deliver big flavor and satisfying crispness using simple, everyday ingredients. Whether you’re curbing cravings between meals or feeding a crowd, this recipe keeps things easy, wholesome, and irresistibly cheesy—without any extra fuss.
Why Cottage Cheese Chips Might Be Your New Favorite Snack
The Crunch You Didn’t Know You Needed
Crunchy snacks are satisfying for a reason—but most options on store shelves are packed with refined carbs and questionable oils. That’s where these Cottage Cheese Chips shine. They’re crisp, savory, and incredibly satisfying while keeping your macros in check. With every bite, you get a punch of protein and bold seasoning that rivals any bagged alternative.
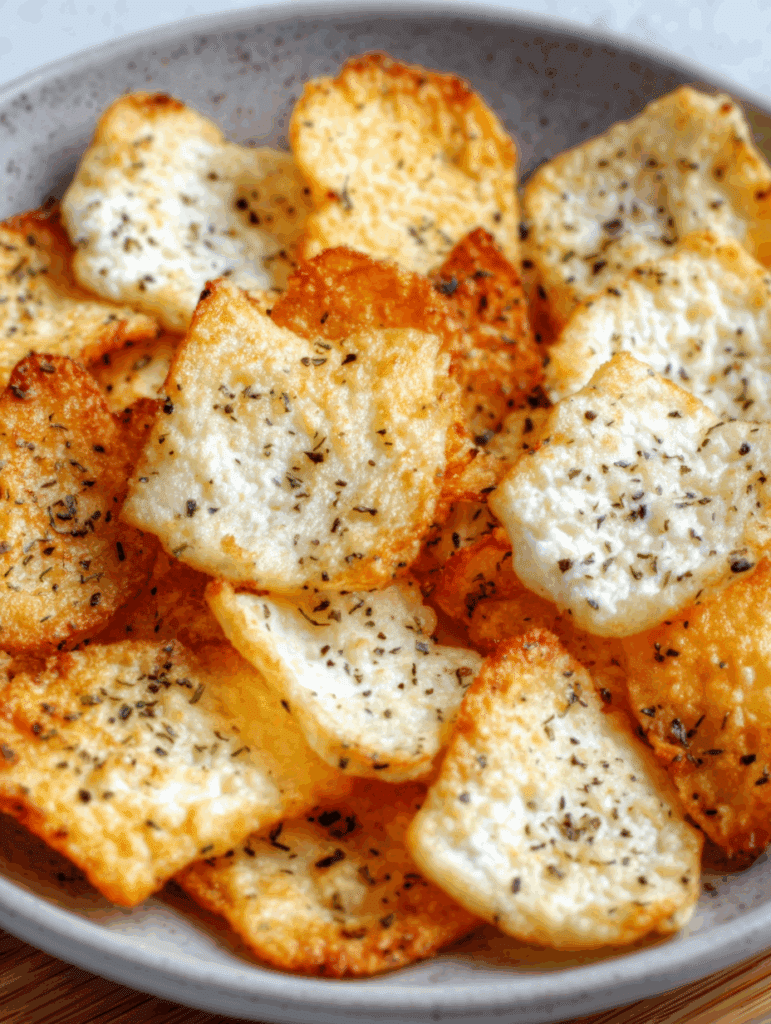
Made with just a few ingredients, these chips prove you don’t need additives or frying oil to create something snack-worthy. Even better? You can switch up the flavors every time you bake a batch. Want a smoky chip? Add paprika. Need a cheesy kick? Toss in nutritional yeast or Parmesan.
If you’ve ever enjoyed our High Protein Strawberry Muffins with Cottage Cheese or Cottage Cheese Flatbread, you already know cottage cheese can surprise you in the best way. These chips are just one more reason to stock up.
Ingredients That Work Smarter
The beauty of this recipe is its flexibility. Full-fat cottage cheese gives you richness and better crisping, but low-fat versions work too. Optional additions like dried herbs, chili flakes, and nutritional yeast let you tailor your flavor profile without overcomplicating things.
A single egg can help with binding and crispness, but you can skip it if you want to keep things egg-free. Whether you’re baking for yourself or prepping a snack table, you’ll appreciate how forgiving and fast this recipe really is.
Recipe
Print
Cottage Cheese Chips
- Total Time: 40 minutes
- Yield: 12–16 chips 1x
Description
These Cottage Cheese Chips are a crisp, high-protein snack made with simple ingredients and bold seasonings—ready in under 30 minutes.
Ingredients
- 1 cup cottage cheese (full-fat or low-fat)
- 1 large egg (optional)
- 1/4 tsp sea salt
- 1/4 tsp garlic powder
- 1/4 tsp onion powder
- 1/4 tsp smoked paprika
- Optional: 2 tbsp grated Parmesan, 1 tbsp nutritional yeast, 1/2 tsp dried herbs, 1/4 tsp chili flakes
Instructions
1. Preheat oven to 350°F and line baking tray.
2. Drain cottage cheese in mesh strainer for 15 minutes.
3. Mix all ingredients until combined.
4. Scoop 1 tbsp portions onto tray and flatten to 0.2 inch.
5. Bake for 20–30 minutes or air fry at 350°F for 8–12 minutes.
6. Let chips cool on tray for 10–15 minutes.
7. Serve immediately or store in airtight container.
Notes
- Try blending for smoother texture.
- Add Parmesan or herbs for custom flavor.
- Store in airtight container for up to 3 days.
- Prep Time: 10 minutes
- Cook Time: 30 minutes
- Category: Snacks
- Method: Baking
- Cuisine: American
Nutrition
- Serving Size: 2-3 chips
- Calories: 40
- Sugar: 0.5g
- Sodium: 120mg
- Fat: 2.5g
- Saturated Fat: 1.5g
- Unsaturated Fat: 1g
- Trans Fat: 0g
- Carbohydrates: 1.5g
- Fiber: 0g
- Protein: 4g
- Cholesterol: 15mg
How to Make Cottage Cheese Chips (Easy Step-by-Step)
Prep Like a Pro: Fast, Flexible, Foolproof
One of the best parts about making Cottage Cheese Chips? You don’t need a complicated setup. Just a bowl, a spoon, and a lined baking tray. But for that signature crunch, one small step makes a big difference—draining your cottage cheese. Taking a few minutes to remove the extra moisture means your chips bake up crisp, not soggy.
If you’ve made our Ranch Crispy Roasted Chickpeas, you already know: texture is everything. Use a silicone baking mat or parchment paper to keep things mess-free. And for a smoother chip texture, you can pulse the cottage cheese mixture in a blender or food processor before baking.
Step-by-Step Method:
- Preheat and Prepare
Set your oven to 350°F (175°C). Line a baking sheet with parchment paper or a silicone mat. - Drain the Cottage Cheese
Place your cottage cheese in a mesh strainer or wrap it in cheesecloth. Let it sit for about 15 minutes. This helps the chips firm up and get crispy. - Mix the Ingredients
In a bowl, combine:- 1 cup cottage cheese
- 1 large egg (optional)
- ¼ tsp each: sea salt, garlic powder, onion powder, smoked paprika
Add-ins (optional): - 2 tbsp grated Parmesan
- ½ tsp dried herbs
- 1 tbsp nutritional yeast
- ¼ tsp chili flakes
- Scoop and Shape
Spoon out tablespoons of the mixture onto your baking sheet, leaving space between each. Flatten with the back of a spoon to 0.2 inches thick. Shape tip: For a fun twist, shape them into triangles or squares. - Bake Until Golden
Bake for 25–30 minutes. Thinner chips may be ready in 20. Flip halfway through for extra crispness, though this step is optional. Air Fryer Alternative: Bake at 350°F for 8–12 minutes for a quick batch. - Cool and Crisp Up
Let the chips cool on the baking sheet for 10–15 minutes. They’ll firm up as they cool. - Serve or Store
Once fully cooled, enjoy right away or store in an airtight container. They’re perfect with dips, crumbled over salads, or just solo.
These chips pair wonderfully with protein-packed spreads, or alongside our Cottage Cheese Banana Oat Protein Pancake Bites for a crave-worthy snack combo.
Flavor Upgrades & Texture Tips for Next-Level Cottage Cheese Chips
Customize Your Crunch: From Smoky to Spicy
Cottage Cheese Chips don’t have to taste the same every time—and that’s the fun part. The base recipe is like a blank canvas that welcomes different herbs, spices, and cheeses to suit your mood or occasion.
Craving something bold and savory? Add smoked paprika and a pinch of chili flakes. Want something bright and aromatic? Try thyme and a touch of lemon zest. The versatility is what makes this snack a go-to. It’s as adaptable as your favorite Chipotle Honey Chicken—flavor-packed but never complicated.
Here are some quick combo ideas:
| Flavor Style | Add-In Suggestions |
|---|---|
| Smoky Umami | Smoked paprika + nutritional yeast + garlic powder |
| Herbaceous | Oregano + thyme + lemon zest |
| Spicy Cheesy | Chili flakes + Parmesan + black pepper |
| Zesty Garlic | Garlic powder + onion powder + white pepper |
Need a sweet-savory twist? Try a pinch of cinnamon with nutritional yeast and a dash of sea salt. It’s unexpected but surprisingly good—especially when paired with our Mini Protein Cheesecakes for a fun snack board.
Texture Tweaks That Actually Matter
Want maximum crisp? Thinner is better. Flattening your chip batter evenly to around 0.2 inches ensures they dry out in the oven without burning. If your batter feels too loose, blend it briefly to make it smoother and easier to shape.
Here’s how to troubleshoot texture:
- Too soft after baking? Let them cool completely. They crisp as they rest.
- Still soggy? Try draining the cottage cheese longer or baking 5–8 minutes more.
- Too thick? Flatten with a spatula or spoon before baking.
These chips are just as flexible as our Powerful Beet & Carrot Juice—full of personality, but always easy to make your own.
How to Serve & Store Cottage Cheese Chips (Plus Pro Nutrition Tips)
Smart Ways to Serve These Protein-Packed Chips
Cottage Cheese Chips aren’t just a solo snack—they’re a crunchy companion to all sorts of meals. Whether you’re feeding a crowd or snacking post-workout, they slide effortlessly onto any plate.
Here are a few quick ideas to make them shine:
- Serve with a dip: Greek yogurt mixed with lemon and herbs makes a bright, high-protein dip that pairs perfectly.
- Pair with soup or salad: These chips bring texture and saltiness to smooth soups or light salads.
- Snack box hero: Add them to your meal-prep containers with boiled eggs, veggies, and fruit for a grab-and-go power plate.
Hosting a party or prepping for the week? This recipe doubles easily. You can even mix up flavors and serve a trio of chip styles—think spicy, herby, and classic.
They go especially well with simple, protein-forward bites like our High-Protein Desserts or the ever-popular Cottage Cheese Flatbread for a crunchy contrast.
How to Store for Peak Crunch (and When to Freeze)
After cooling completely, store your chips in an airtight container at room temperature for up to 3 days. They’ll stay crisp if you avoid moisture.
Want to keep them longer?
- To revive crispiness: Pop them in the oven at 300°F for 5 minutes.
- Avoid fridge storage: The moisture softens them.
- Freeze? Not ideal—they lose their crunch.
Quick Storage Recap:
- Airtight container, cool/dry spot
- Reheat to crisp if needed
- Best within 48 hours for top texture
Nutrition Tips for Every Goal
These chips are naturally low in carbs and high in protein, especially when using full-fat cottage cheese and the optional egg. Want to level up even more?
- Add nutritional yeast for extra B-vitamins and a cheesy flavor
- Use low-fat cottage cheese if you’re watching calories
- Add Parmesan for umami depth and more calcium
These small tweaks let you adjust the recipe based on your fitness or wellness goals—just like we do in every Evardi dish. Whether you’re bulking, cutting, or just looking for clean snacks, these chips hit the mark.
For anyone who’s a fan of make-ahead goodness, they’re the crunchy cousin to our Cottage Cheese Banana Oat Protein Pancake Bites—different texture, same snackable satisfaction.