These irresistible cheeseburger sliders pack big flavor into bite-sized packages – perfect for game days, weeknight dinners, or feeding hungry crowds. Ready in just 30 minutes with minimal prep work, they’ll become your new favorite quick meal solution.
The sweetness of Hawaiian rolls balances perfectly with the savory beef filling, while melted cheese and a special buttery topping create comfort food perfection.
Why You’ll Love These Cheeseburger Sliders
Everyone goes crazy for these sliders because they combine three things people adore: melty cheese, juicy beef, and soft bread. The Hawaiian rolls add a hint of sweetness that elevates the whole experience beyond regular slider buns. Plus, the simple baking method means no messy grilling or flipping individual burgers. Since you cook the entire tray at once, these sliders shine for effortless entertaining.
Family-Friendly Crowd Pleaser
Kids and adults both devour cheeseburger sliders with Hawaiian rolls because they’re delicious and easy to eat. Small hands love the manageable size, while grown-ups appreciate the grown-up flavors. You can customize them to accommodate different spice preferences.
Recipe
Print
Cheeseburger Sliders with Hawaiian Rolls (30 Min)
- Total Time: 30 min
- Yield: 6 servings 1x
Description
Melty cheeseburger sliders baked on sweet Hawaiian rolls with seasoned beef and special butter topping – ready in 30 minutes!
Ingredients
- 1 pound ground beef (450 g)
- 1 small onion (diced)
- 2 tablespoons ketchup
- 1 teaspoon salt
- ½ teaspoon pepper
- 1 package Hawaiian Rolls (package of 12)
- 10–16 slices Cheddar
- 3 tablespoons butter (melted)
- 1 tablespoon Dijon mustard
- 1 tablespoon plant-based seasoning sauce
- 1 tablespoon Everything Bagel seasoning
Instructions
- Preheat oven to 350°F (175°C) and line baking sheet with parchment.
- Brown ground beef and onions in skillet, drain grease, mix in ketchup, salt and pepper.
- Slice rolls horizontally while keeping them connected.
- Place bottom halves on pan, layer cheese, beef, more cheese, then top with roll halves.
- Mix melted butter, mustard, plant-based sauce and seasoning in bowl.
- Brush butter mixture over tops and sides of rolls.
- Cover with foil and bake 10 minutes. Remove foil and bake 7-10 more minutes.
- Serve immediately.
Notes
- Use lean ground beef for best texture
- Substitute turkey or plant-based crumbles as needed
- Freeze unbaked sliders for future meals
- Prep Time: 10 min
- Cook Time: 20 min
- Category: Main Course
- Method: Baked
- Cuisine: American
Nutrition
- Calories: 290 kcal
- Sugar: 2 g
- Sodium: 1109 mg
- Fat: 19 g
- Carbohydrates: 5 g
- Fiber: 0.4 g
- Protein: 23 g
Ingredients and Substitutions
Base Components
In your shopping list, you’ll find these easy ingredients plus clever substitution ideas:
- Ground beef (1 pound/450g) – For lighter options, try ground turkey or chicken (85% lean keeps moisture)
- Small onion (diced) – Yellow or white onions work great, or use 1 tbsp onion powder if out of fresh
- Ketchup (2 tablespoons) – Substitute tomato paste mixed with 1 tsp vinegar and ½ tsp sugar
- Slider rolls (12-pack) – Hawaiian rolls preferred, but brioche or gluten-free options work too
Sauce and Seasonings
- Cheddar cheese slices (10-16) – Use American, provolone, or pepper jack for different flavors
- Butter (3 tbsp melted) – Substitute olive oil mixed with garlic powder for dairy-free
- Mustard (1 tbsp) – Yellow mustard adds classic flavor; Dijon brings extra zing
- Plant-based sauce (1 tbsp) – Our savory alternative brings rich umami depth
- Everything Bagel seasoning (1 tbsp) – Substitute sesame seeds mixed with minced garlic and onion
How to Make Cheeseburger Sliders
Step 1: Prep and Cook Beef Mixture
Start by preheating your oven to 350°F (175°C). Line a baking sheet with parchment paper or lightly grease a 9×13-inch dish. Brown the beef and onions in a large skillet over medium-high heat, breaking up the meat into small pieces. Drain any excess fat before stirring in ketchup, salt, and pepper.
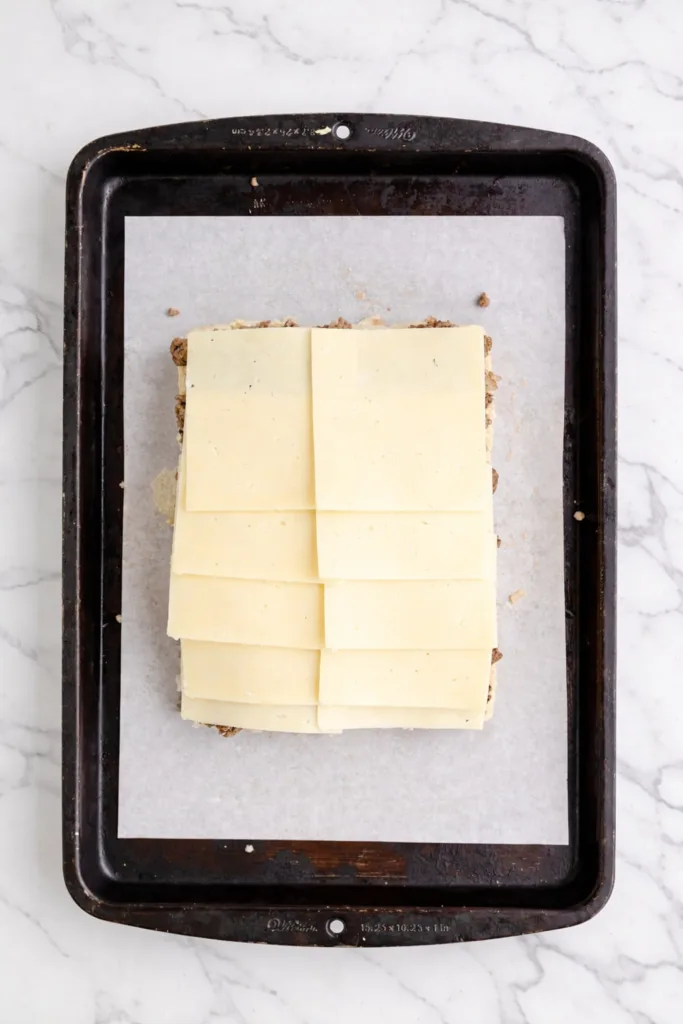
Step 2: Assemble Sliders
Carefully slice your rolls horizontally while keeping them connected. Place the bottom halves on your prepared pan. Layer cheese slices over the bread, spread the beef mixture evenly, then add another cheese layer before capping with the roll tops. For extra cheesy goodness, try our cheesy ground beef and potato bowls method between burger layers.
Step 3: Create Butter Glaze
Whisk melted butter with mustard, plant-based sauce, and seasoning. Generously brush this mixture over the tops and sides of the slider rolls – this creates that gorgeous golden crust everyone finds irresistible.
Step 4: Bake to Perfection
Cover the sliders with foil and bake for 10 minutes to warm everything thoroughly. Remove the foil and bake 7-10 minutes more until the cheese bubbles and the rolls turn golden-brown. Serve immediately when they’re piping hot!
Pro Tips for Success
- Don’t skimp on draining fat – Removing excess grease prevents soggy bottoms
- Use a serrated knife – It helps cut slider rolls cleanly without smashing them
- Add moisture barriers – Spread a thin mayo layer on the bottom bun before adding cheese to prevent sogginess
- Remove foil carefully – Steam escapes quickly, so watch your hands and face
Flavor Variations
International Twists
Swap regular burger seasoning for taco spices to create a Mexican-inspired version perfect for pairing with walking taco casserole sides. Asian variations work great too – mix hoisin sauce and ginger into the beef, then top with crispy onions.
Diet Adjustments
- Keto: Use almond flour rolls and sugar-free ketchup
- Gluten-free: Choose certified gluten-free buns and sauce alternatives
- Vegetarian: Substitute plant-based ground crumbles and vegan cheese
Serving Suggestions
Cheeseburger sliders with Hawaiian rolls pair beautifully with crispy fries, fresh salads, or tangy coleslaw. Serve them alongside pickles and extra sauce for dipping. They’re a natural fit for picnics and game day parties. For complete meal planning, try these with our flavorful Korean ground beef bowl as complementary dishes.
Storage and Freezing Instructions
Refrigeration
Store leftover sliders in an airtight container for up to 3 days. Reheat in a 300°F oven for 10 minutes to restore crispness.
Freezing Tips
- Freeze assembled unbaked sliders wrapped tightly in foil
- No need to thaw – bake frozen sliders 25 minutes covered, 10 uncovered
- Freezer life: 2 months maximum for best quality
Nutrition Facts per Serving
| Calories | Fat | Carbs | Protein | Fiber | Sugar | Sodium |
|---|---|---|---|---|---|---|
| 290 kcal | 19 g | 5 g | 23 g | 0.4 g | 2 g | 1109 mg |
FAQs About Cheeseburger Sliders
Can I prepare sliders ahead?
Absolutely! Assemble them without baking and refrigerate up to 24 hours. Add 5 extra minutes when baking from chilled.
Why choose Hawaiian rolls?
They provide sweetness that balances savory ingredients beautifully, plus they hold toppings well without getting soggy.
How to prevent soggy buns?
Lightly toast bottom halves before assembling. Also, spread sauces only on beef layer, not directly onto bread.
Final Thoughts
These cheeseburger sliders deliver maximum flavor with minimal effort, making them ideal for busy families and last-minute gatherings.
Perfectly portioned and satisfyingly cheesy, they transform basic ingredients into something extraordinary. Once you try this method, you’ll understand why it earns rave reviews from everyone who tastes it.
Whether serving them as appetizers or main courses, these sliders disappear fast – be prepared to make double batches! Whip them up today and enjoy the delicious cheers around your table.